os73
  • Windowsويندوز
  • posts
  • Mobile phonesالأجهزة
  • Privacy Policy
  • About
  • English
  • العربية
Wednesday, May 14, 2025
os73
  • Windowsويندوز
  • posts
  • Mobile phonesالأجهزة
  • Privacy Policy
  • About
  • English
  • العربية
os73
os73
  • Windowsويندوز
  • posts
  • Mobile phonesالأجهزة
  • Privacy Policy
  • About
  • English
  • العربية
جميع الحقوق محفوظة @ OS73
Mobile phonesSolution

How to Remove SafetyCore App to Protect Your Privacy

by طارق April 2, 2025
الكاتب طارق

Solution | How to Remove SafetyCore App to Protect Your Privacy

In a world increasingly reliant on smartphones, data privacy concerns are becoming a major issue for users—one such concern is SafetyCore.

Developed by Google, SafetyCore is designed to monitor apps on Android devices and is marketed as a user protection tool.

However, its functionality may grant Google extensive permissions to collect user data. Here’s a detailed breakdown along with steps to remove it if you wish.


What is : SafetyCore?


SafetyCore is part of the Google Play Protect framework, developed for Android devices running Android 9 or later.


It was rolled out in November 2024 and operates as a system app running in the background.


It is designed to automatically scan apps in the background (Background Scanning) to detect:

  • Malware or viruses

  • Apps performing unauthorized operations

  • Suspicious activity violating Google’s policies


The main function of SafetyCore, according to Google, is to warn users about potentially sensitive images in Google Messages. If you receive an image that may contain nudity, SafetyCore automatically blurs it to prevent accidental exposure.


However, the issue is that it operates without explicit user notification and collects data such as:

  • A complete list of installed apps

  • Real-time behavior analysis of applications

  • Device usage details, including power-on and power-off times


Why: Would You Want to Remove It?

Despite Google’s claims that SafetyCore is designed for protection, there are valid concerns, including:


  • Access to sensitive data such as emails or locally stored files

  • Lack of transparency about what data is tracked and how it’s used

  • Resource consumption, as background scans may slow the phone or drain battery life


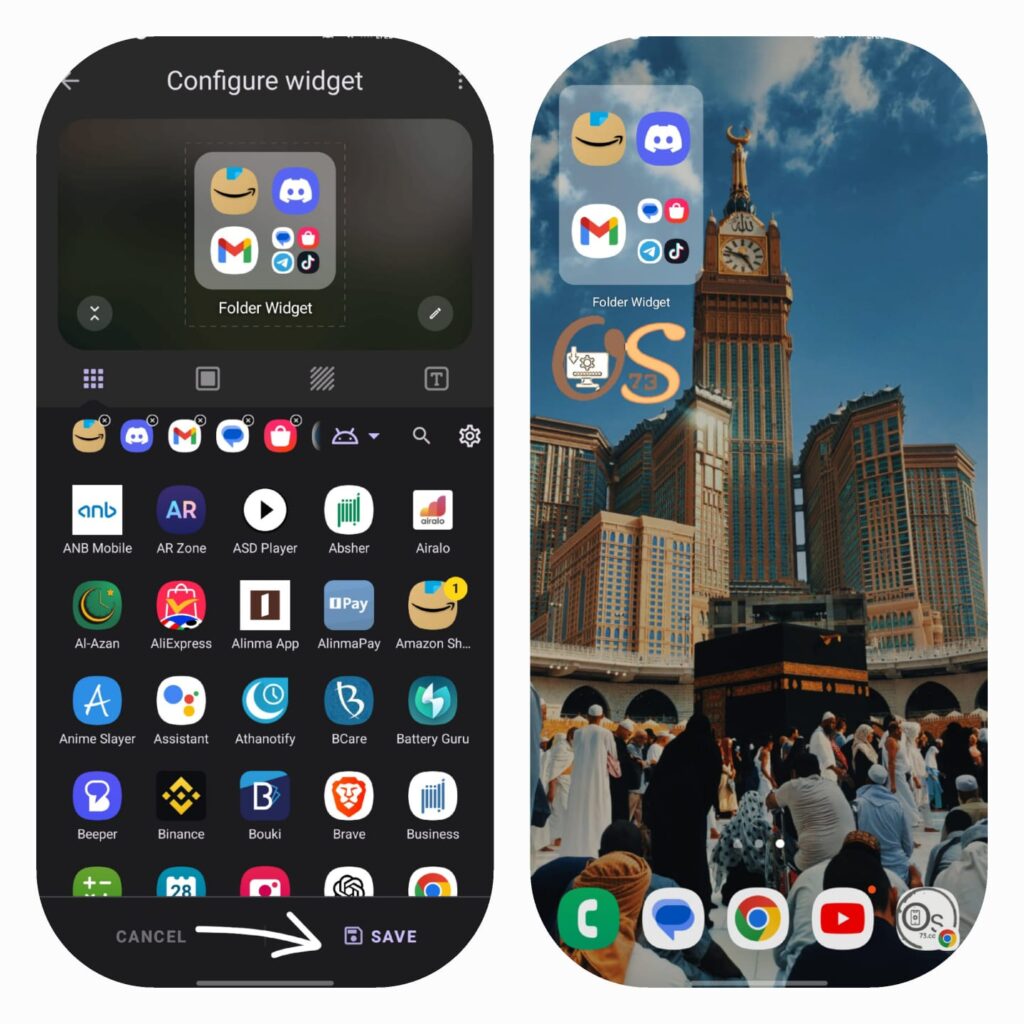
Steps to : Remove SafetyCore from Your Phone

To disable SafetyCore, you must revoke its Device Administrator permissions. Follow these steps carefully:

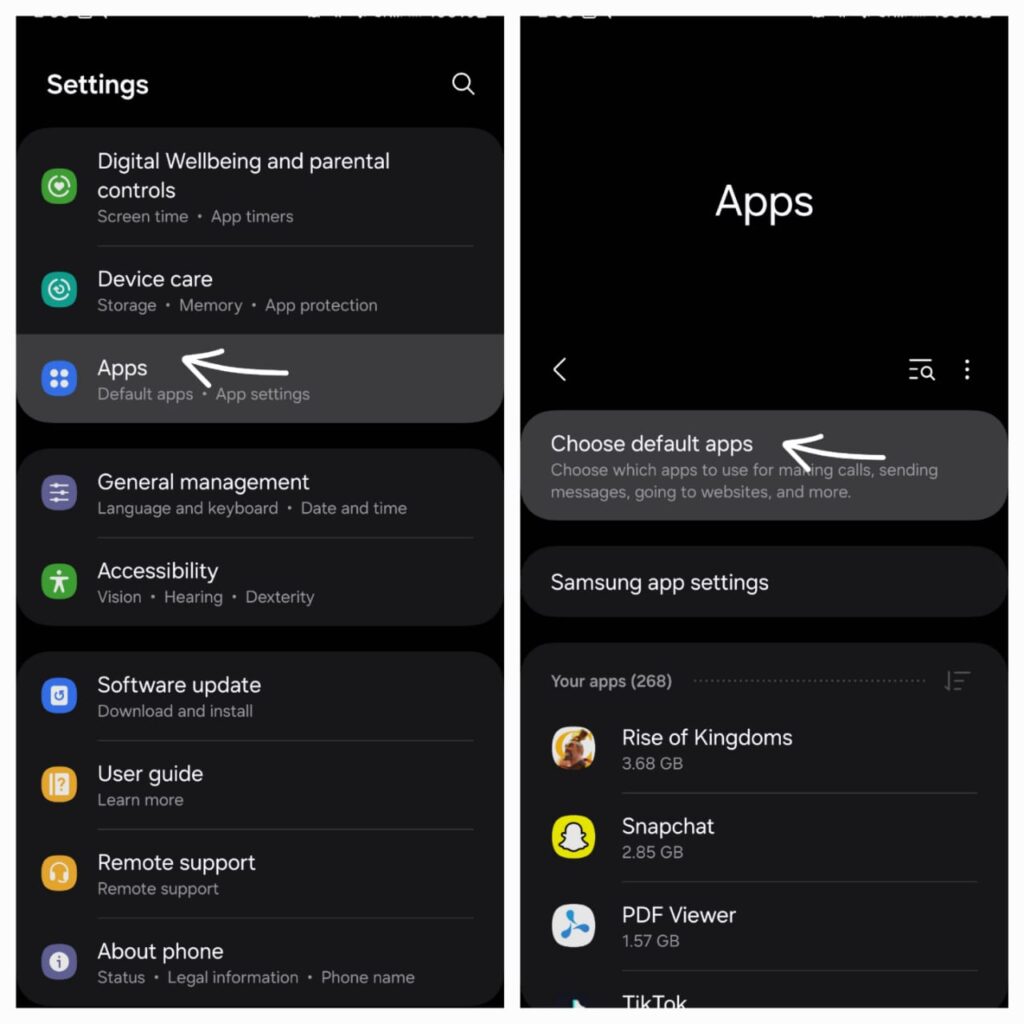
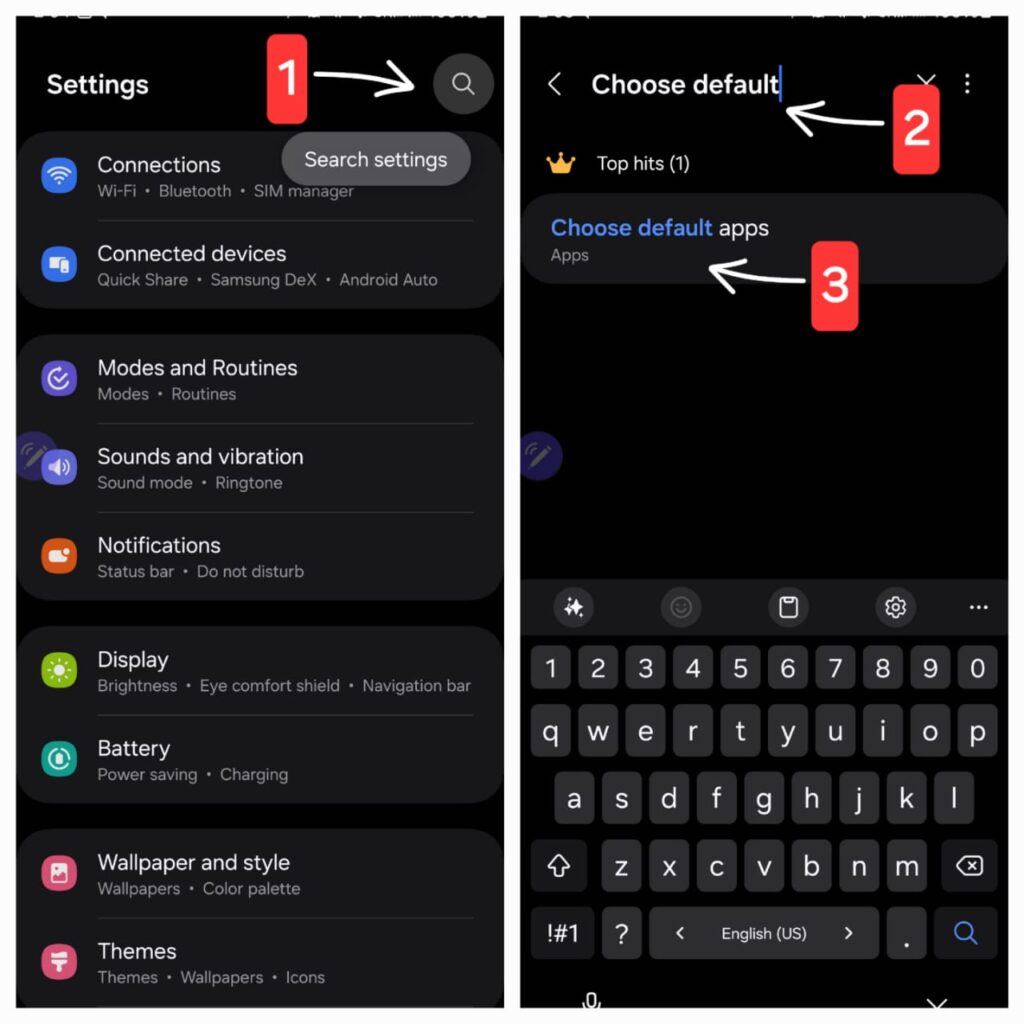
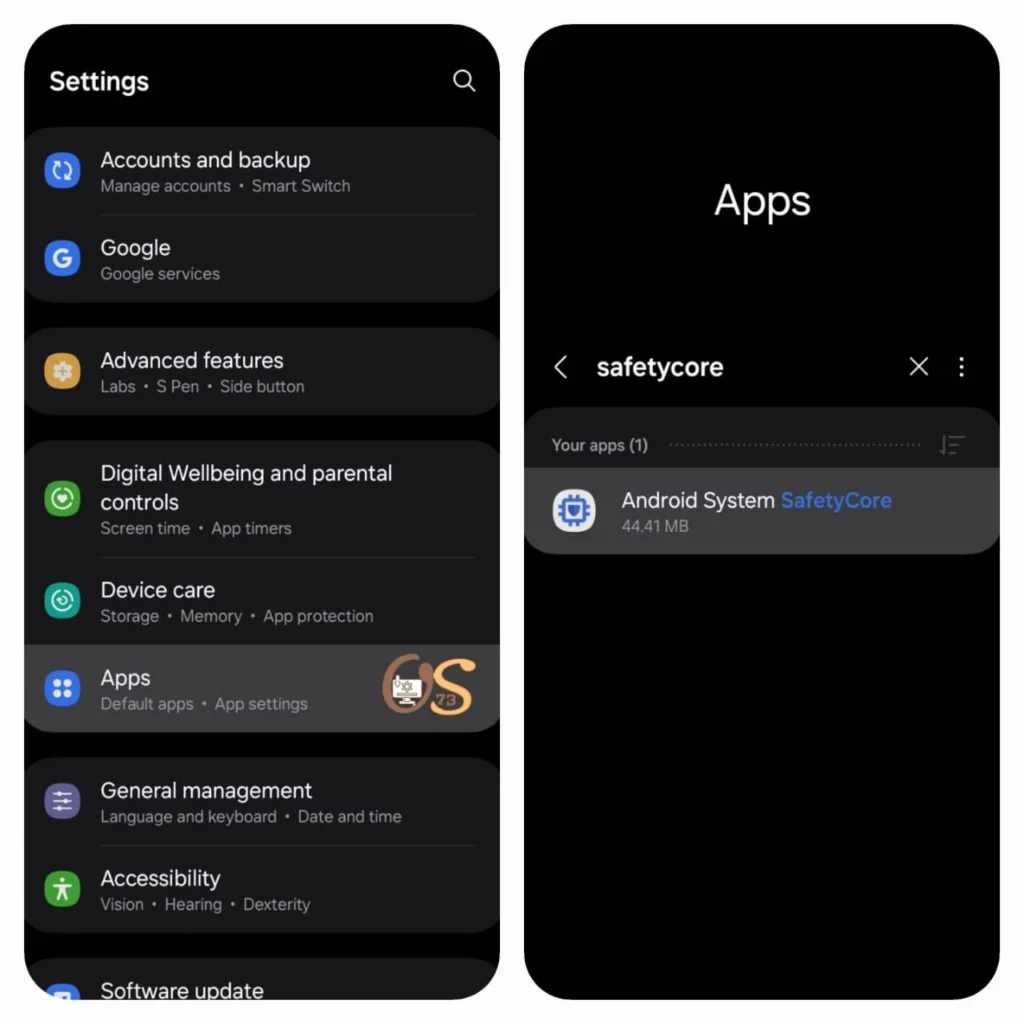
  • Open your phone’s settings (Settings).

  • Go to Device Admin Apps (or Apps with Admin Access).

  • Look for Google Play Protect or SafetyCore in the list.


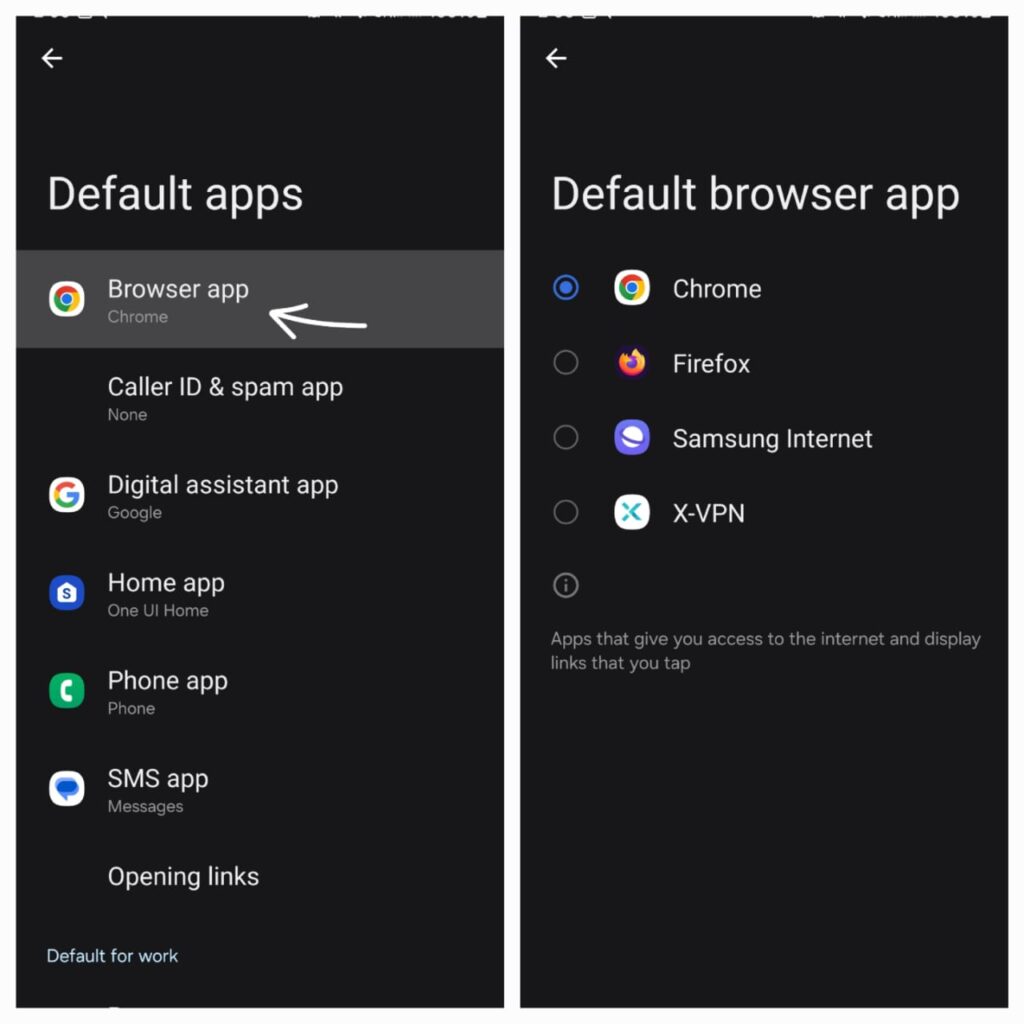
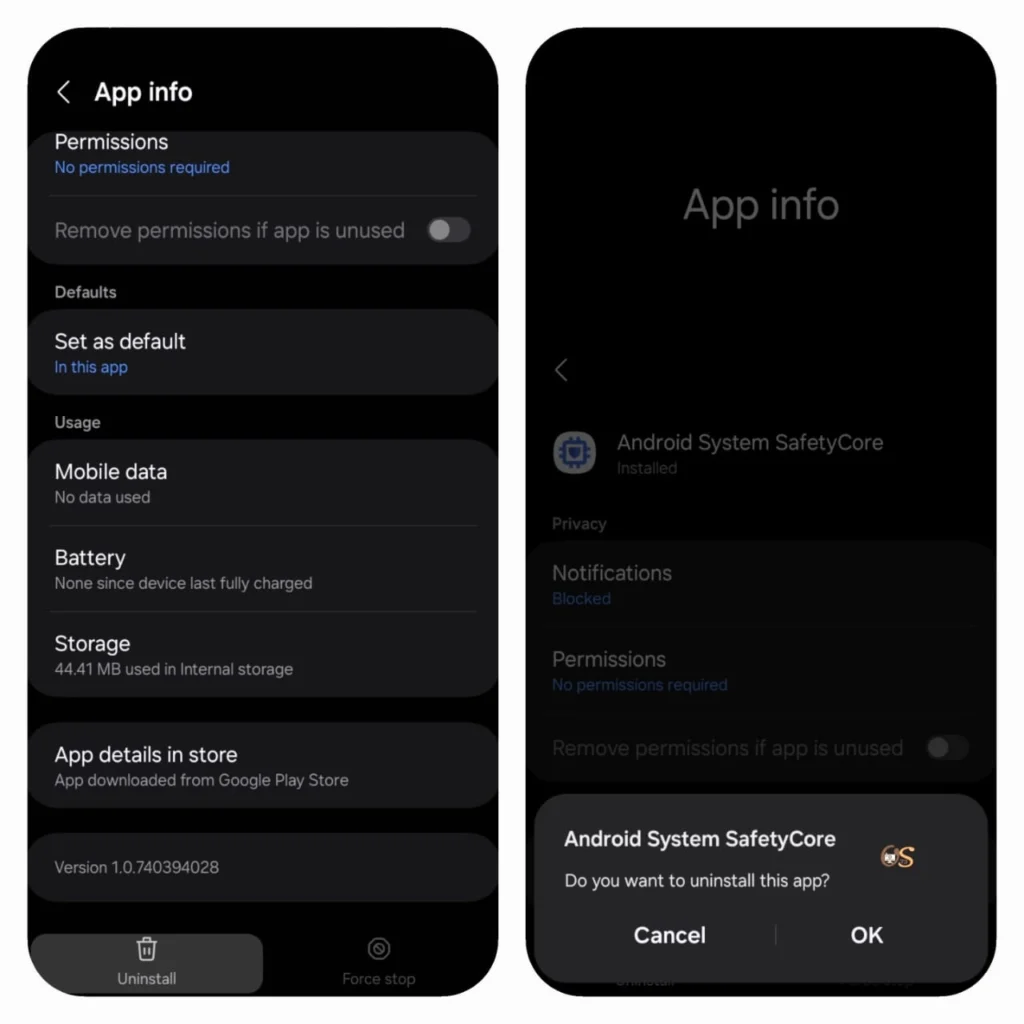
  • Tap on the app and select Deactivate to revoke its permissions.

  • Restart your phone to apply the changes


Potential Risks of : Removing SafetyCore

  • Increased exposure to threats: Malicious apps could exploit security vulnerabilities.

  • App compatibility issues: Some apps, like Google Pay, require active protection frameworks.

  • Delayed security updates: SafetyCore helps Google update threat lists, and disabling it may delay security patches.


Additional Privacy Measures

To enhance your privacy, consider these alternatives:

1- Reduce reliance on Google services:

    • Use a browser like Brave to block tracking.

    • Replace Gmail with ProtonMail, an encrypted email service.


2- Review app permissions regularly:

  • Go to Settings → Apps → [Select an App] → Permissions

  • Remove unnecessary access (e.g., microphone, location).


By following these steps, you can take control of your privacy and decide how much access Google has to your device.

    April 2, 2025 0 تعليق
    0 FacebookTwitterPinterestWhatsappTelegramEmail
    Tech News

    Samsung May Outpace Apple and Qualcomm in the 2nm Battle

    by طارق March 29, 2025
    الكاتب طارق

    Tech News | Samsung May Outpace Apple and Qualcomm in the 2nm Battle

    The smartphone industry has always witnessed fierce competition between tech giants Apple and Samsung to offer the fastest and most advanced processors. Today, we are facing the battle of 2-nanometer technology.


    Currently, there is a technical tie between them. The iPhone 16 series relies on the A18 chip, manufactured with 3-nanometer technology, while the Galaxy S25 series features Qualcomm’s Snapdragon 8 Elite, also built on a 3-nanometer process. However, Samsung may soon break this tie.


    Apple: A Delayed Entry into 2-Nanometer Technology


    Prominent analysts, such as Ming-Chi Kuo, predict that Apple will launch its first smartphones with 2-nanometer processors in the second half of 2026. This will come with the iPhone 18 series, featuring the Apple A20 chip.

    Reiterating my prediction from six months ago: the 2H26 new iPhones (iPhone 18) will be powered by TSMC’s 2nm chips.Worth noting, TSMC’s 2nm R&D trial yields reached 60–70% three months ago, and they’re now well above that. https://t.co/ZoWXFqfUnS

    — 郭明錤 (Ming-Chi Kuo) (@mingchikuo) March 22, 2025
     

    This delay is due to Apple’s exclusive chip manufacturer, Taiwan’s TSMC, which will not be able to begin mass production of this technology before that time.


    Samsung: Accelerating Progress


    On the other hand, Samsung Foundry has made significant advancements in developing 2-nanometer technology.


    Expectations suggest that it will integrate this technology into the Exynos 2600 processor, set to launch with the Galaxy S26 series in the first half of 2026.


    If this happens, Samsung will be at least six months ahead of Apple, giving it a major marketing advantage.


    Qualcomm: In the Background

    Apple is not the only competitor. Samsung’s other rival, Qualcomm, is also planning to release 2-nanometer processors in 2026, though the exact timeline remains unclear.


    Since Qualcomm relies on TSMC for manufacturing—and TSMC is expected to lag behind Samsung—Samsung may gain an exclusive advantage in introducing the most advanced smartphones.


    Final Predictions

    If Samsung manages to stay on schedule, it could reshape the landscape of technological dominance and prove that leadership in chip manufacturing is not exclusive to Apple and its partners.

      March 29, 2025 0 تعليق
      0 FacebookTwitterPinterestWhatsappTelegramEmail
      WindowsWindows explanations

      Enter BIOS Settings with One Click!

      by طارق March 23, 2025
      الكاتب طارق

      Tutorials | Enter BIOS Settings with One Click!

      Imagine this scenario: You buy a new computer or upgrade your system, and you need to adjust BIOS settings to disable a feature or change the boot priority.


      You start frantically pressing keys like F2, Delete, or Esc during startup, but you fail repeatedly because the timing is too precise! Sometimes, you end up rebooting five times in a row without success.


      This highlights the need for a smarter approach, especially in our fast-paced tech era. What if I told you could enter the BIOS by simply right-clicking your mouse directly from the desktop?


      In this article, we’ll reveal professional steps to pull off this trick—whether through registry edits —along with critical warnings to ensure success without errors.


      Right-Click: Create a One-Click Shortcut to Enter BIOS

      Our method relies on adding a shortcut to the right-click context menu. We’ll create a shortcut that grants instant access to the BIOS.


      ⏩ Step 1: Open the “Run” Window

      Press Win + R, type regedit, and hit Enter.

      You’ll see security warnings → Click Yes to proceed.


      ⏩ Step 2: Navigate to the Registry Path

      Go to this path in the left sidebar:

      HKEY_CLASSES_ROOT\DesktopBackground\Shell


      Here, you’ll see a list of existing right-click menu shortcuts.


      ⏩ Step 3: Create a New Key Named “Open UEFI Settings”

      Right-click the Shell folder → New → Key → Name it:

      BIOS (you can use any preferred name).


      ⏩ Step 4: Enter the Magic Command!

      Inside the new key, create a subkey named Command.


      Double-click the Default value → Paste this command:

      shutdown /r /fw /t 0

      (Note: This command directs the system to reboot and enter BIOS immediately.)


      What next? Now it’s time to test the shortcut yourself

      1- Right-click any empty area on your desktop → You’ll see a new option labeled “BIOS” → Click it!


      2- Your PC will reboot instantly and take you directly to the BIOS/UEFI interface—no key presses required!


      For aesthetics: add an icon to the shortcut

      To customize further and add an icon:


      ⏩ Step 1: Download an Icon
      Search online for BIOS-related icons, download one, and convert it to .ico format. Many websites offer free icon conversion.


      ⏩ Step 2: Edit the Registry to Add the Icon
      Go back to the Command key → Right-click the right panel → New → String Value → Name it Icon.


      Double-click the new value → Enter the icon’s file path, e.g.:
      C:\Icons\bios_icon.ico


      To copy the icon’s path: Hold Shift → Right-click the icon → Select “Copy as path“.
      (Note: Replace the path with the actual location on your system.)


      ⏩ Step 3: Test the Result
      Right-click the desktop → The BIOS shortcut will now appear with your custom icon!


      Conclusion: Goodbye Traditional Methods- Hello Smart Solutions!

      Now that you’ve learned how to enter BIOS via a right-click shortcut, you no longer need to struggle with frantic key presses or perfect timing during boot.


      This trick isn’t just a time-saver—it’s a gateway to exploring advanced settings that once seemed daunting. Try it today, and share this article with friends who face the same struggle! 💻✨


        March 23, 2025 0 تعليق
        0 FacebookTwitterPinterestWhatsappTelegramEmail
        ِAppsMobile phones

        Folder Widget: An App Organization Tool for Android

        by طارق July 9, 2024
        الكاتب طارق

        apps | Folder Widget: An App Organization Tool for Android Phones

        Are you overwhelmed by app clutter on your phone screen? Looking for a way to organize them better and make them easier to access? Here’s the solution! The Folder Widget app.


        Folder Widget app provides an ideal solution to this problem. It offers great capabilities for organizing your Android phone apps efficiently and easily, giving you a tidy and attractive phone screen that allows easy access to frequently used apps.


        The app is a tool for organizing your apps on your Android phone, allowing you to place apps inside folders on the home screen.


        Folder Widget


        you can : With the Folder Widget app

        • Create custom folders to organize your apps by category or usage, such as “Social Media,” “Games,” or “Work.”
        • Customize the appearance of folders by choosing icons, backgrounds, and colors that match your taste.
        • Add shortcuts for the most frequently used apps inside the folders, saving you time and effort.
        • Support adaptive icons for Android 12, giving your phone a more modern look.
        • Enjoy ease of use with an intuitive interface that allows you to create and customize folders effortlessly.
        • Experience a lightweight app that does not significantly impact your phone’s performance.


        However, like any app, Folder Widget may have some drawbacks, such as:


        • Ads: The app may include some ads that could be annoying to some users.
        • Paid premium features: Some advanced features, like the ability to lock folders with a password, require purchasing the paid version of the app.
        • Limited support for all app types: The app may not work correctly with certain types of apps, such as instant messaging apps.


        Overall, Folder Widget is a valuable tool for organizing Android apps and significantly enhancing the user experience. Despite some minor drawbacks, it is worth trying, especially for users struggling with app clutter


        Download the : Folder Widget application

        Folder Widget


        Application size:31.66 MB
        APP COMPATIBILITY:Supports all operating systems, including Android
        License:Free, and there is a possibility of purchase


        Application download link

        Free data transfer application


        How to : Use the Folder Widget App

        Step One:

        • Download and install the app from the link above.
        • Tap on the home screen until the “Widgets icon” appears, then tap on it.
        • Now, choose the style you prefer.


        Folder Widget


        Step Two:

        • Select the apps you want to place inside the folder you created.
        • The folder will appear on the home screen with the apps you selected.


        Folder Widget


        Conclusion:

        With the Folder Widget app, you can easily organize your Android phone apps and enhance your phone usage experience. Try the app today and enjoy a neat and attractive phone screen!


          July 9, 2024 0 تعليق
          0 FacebookTwitterPinterestWhatsappTelegramEmail
          Mobile phonesSolution

          The best alternative app stores to Google Play

          by طارق July 6, 2024
          الكاتب طارق

          Solution | The best alternative app stores to Google Play

          Google Play Store is a primary platform for Android apps, but it is not the only option as many alternative app stores have emerged offering unique features.


          Alternative app stores, as we’re discussing, are not subject to Google’s policies, thus they contain some excellent applications that Google has removed from its store for one reason or another.


          However, it should be noted that using alternative app stores to Google Play is not recommended unless you are very cautious, for several reasons that we will mention to you. Nevertheless, there are also benefits to using such stores.


          The risks of alternative app stores to Google Play include ?

          1. Malware: Some alternative stores may contain harmful or unsafe applications that could pose security issues for your phone or tablet.

          2. Instability: Some alternative stores may be unstable or unreliable, leading to an unsatisfactory user experience or even data loss.

          3. Lack of support: You may not receive the same level of support from app developers or the app store itself compared to Google Play.


          Therefore it is important to:

          – Carefully research the store: Read reviews and verify its reputation before using it.
          – Download apps from trusted sources: Look for app ratings and user reviews before installation.
          – Install antivirus software: To protect your device from malware.
          – Regularly update apps: To maintain device security against vulnerabilities.


          Benefits of alternative app stores to Google Play include ?

          1. App Diversity:
          – Some alternative stores offer apps not available on Google Play, such as open-source apps or apps banned in certain countries.
          – You may find modified apps or older versions that are not present on Google Play.


          2. Different Experience:
          – Some alternative stores provide a unique user interface or additional customization options compared to Google Play.
          – Certain stores may focus on specific types of apps, such as educational apps or apps specialized in a particular field.


          3. Greater Freedom for Developers:
          – Some alternative stores allow developers to publish their apps without strict restrictions like those on Google Play.
          – They may offer better opportunities for independent developers to reach a wider audience.


          4. Privacy and Security:
          – Some alternative stores may offer stricter privacy and security options compared to Google Play.
          – They may provide greater control over the data collected about you.


          These benefits make alternative app stores attractive for users seeking more variety, unique experiences, and different approaches to privacy and developer freedom.


          Alternative to Google Play Store


          1- First Store: Droid-ify Store

          Droid-ify Store is a platform specialized in offering open-source applications for Android systems. The store aims to provide an alternative to Google Play by offering secure applications, especially for those who prefer free and open-source software.


          Features of Droid-ify Store


          • Open-Source Applications: All applications available in the store are open-source, allowing users to view the source code and verify security and privacy.
          • No Tracking: The store does not track user activity or collect their data.
          • Continuous Updates: Applications are regularly updated to ensure users have access to the latest features and security improvements.
          • Completely Free: All applications are completely free, making it an ideal choice for those looking for quality software without cost.


          Download Droid-ify Store:


          App Size:42.12 MB
          App Compatibility:Supports Android devices
          License:Free


          Link to download the store from github


          Link to download the store from F-Droid


          Second Store: Aurora Store

          Aurora Store is an alternative app store to Google Play, allowing users to download and update applications without needing a Google account.


          The store is distinguished by several features that make it an excellent choice for Android users seeking privacy and freedom in app usage.


          Its standout feature is that it labels apps that collect your information with an “Anti-Feature” tag for transparency purposes, protecting you from the worst flaws such as data theft and privacy breaches.


          Features of Aurora Store

          • No Google Account Required: Users can download and update apps without the need to create a Google account, preserving their privacy.
          • Open Source: The app is open-source, allowing users to view the source code and verify security.
          • Simple and Attractive User Interface: It features an easy-to-use user interface with regular updates to enhance user experience.
          • Choice of Download Source: Users can choose the source from which to download apps from a variety of stores, including Google Play.
          • Fast Updates: Provides regular and fast updates for apps, ensuring users have access to the latest features and security enhancements.


          Download Aurora Store :


          App Size:17.55 MB
          App Compatibility:Supports Android devices
          License:Free


          Link to download the store from github


          Link to download the store from F-Droid


          Third Store: Obtainium Store

          Obtainium is a relatively new application aimed at facilitating the downloading of open-source applications and their updates.


          The app serves as a platform to provide Android applications for free and securely, with a focus on privacy protection and avoiding tracking.


          It is not strictly a store for applications in the literal sense, but rather can be considered a “store for app updates.” Its primary function is to update applications installed on your phone regardless of where they were originally downloaded from.


          Whether the app was downloaded from a different store, forum, or installed directly as an APK file, Obtainium allows you to update these applications if updates are available.


          alternative app stores


          Features of Obtainium:

          • User Privacy: The app does not require a Google account and does not track user activity.
          • Open Source: All applications are open-source, allowing users to view the source code.
          • Regular Updates: Provides regular updates for applications downloaded through Obtainium or from other sources to ensure their security and stability.
          • Ease of Use: A simple and easy-to-navigate user interface makes it easy to find and download applications.
          • Completely Free: There are no charges for downloading or updating applications through Obtainium.


          Download Obtainium:


          alternative app stores


          App Size:21.55 MB
          App Compatibility:Supports Android devices
          License:Free


          Link to download the store from github


          Link to download the store from F-Droid


          Fourth Store : F-Droid Store

          F-Droid is an alternative and open-source app store for the Android operating system, focusing on providing free and open-source applications.


          F-Droid is an ideal choice for those seeking privacy and full control over the software they use.


          What sets F-Droid apart is its unique feature resembling a Linux distribution, allowing users to modify it as they wish and add any third-party applications. F-Droid also enables automatic or manual updates for applications.


          alternative app stores


          Features of F-Droid:

          • Open Source: All applications available on F-Droid are open-source, meaning the source code is available for review and scrutiny.
          • Ad-Free: Applications on F-Droid are free from advertisements, providing a more comfortable user experience.
          • User Privacy: F-Droid does not require a Google account to download or update applications, and it does not track user activity.
          • Completely Free: All applications available on F-Droid are completely free of charge.
          • Multiple Repositories: Users can add additional application repositories to expand the range of available applications.


          Download F-Droid:


          alternative app stores


          App Size:199 MB
          App Compatibility:Supports Android devices
          License:Free


          Link to download the store from github


          Link to download the store from F-Droid


          In conclusion

          There are also many other stores not mentioned here, such as the “Amazon Appstore” but it may not be compatible with all Android devices.


          You should give yourself the opportunity to try out these stores to discover their contents of very useful applications and tools, but also be cautious of their sources before installing them.


            July 6, 2024 0 تعليق
            0 FacebookTwitterPinterestWhatsappTelegramEmail
            WindowsWindows explanations

            Sherlock tool for searching online accounts

            by طارق July 5, 2024
            الكاتب طارق

            Tutorials | Sherlock tool for searching online accounts

            In some cases, you need to search for available information about someone on social media platforms such as Facebook, Instagram, YouTube, and others. The solution is the Sherlock tool.


            The Sherlock tool saves you a lot of effort and time required for the search process, as you can provide it with the person’s username.


            It will then search for accounts associated with that username on social media networks or websites where the tool detects a potential connection.


            What is the : Sherlock tool ?

            Sherlock is an open-source project available on GitHub. It uses the Python programming language to search for aliases across more than 300 social media platforms and various websites.


            The tool makes HTTP requests to these sites using the specified alias and checks for the existence of accounts with that name.


            Sherlock tool


            Features of : Sherlock Tool

            1. Search Across Multiple Platforms: Sherlock can search for accounts on various social media sites such as Facebook, Twitter, Instagram, YouTube, and others.
            2. Search Accuracy: Sherlock uses advanced techniques to search for related accounts, providing accurate and efficient results.
            3. Ease of Use: Sherlock comes with an easy-to-use interface, making it suitable for both beginners and advanced users alike.
            4. Advanced Options: Sherlock offers advanced options for its users, such as searching for similar accounts, filtering by country, language, and more.
            5. Tor Support: Sherlock can be used with Tor to ensure user privacy and security.
            6. Output Results: Sherlock provides the ability to save search results in various formats such as CSV, XLSX, and JSON.


            What are the uses of : Sherlock?

            1. Searching for information about someone: Sherlock can be used to find all accounts associated with a person on social media, which can help you get to know them better.
            2. Identity verification: Sherlock can be used to verify someone’s identity by searching for their accounts on social media.
            3. Competitor research: Sherlock can be used to search for your competitors’ accounts on social media, which can help you improve your marketing strategies.
            4. Gathering information on a topic: Sherlock can be used to search for accounts related to a particular topic, which can help you gather information on that subject.


            Requirements:  Sherlock Tool

            Operating System Requirements:

            • Kali Linux: Sherlock is highly recommended to be used on Kali Linux, a Linux distribution specifically designed for penetration testing and security, as the tool is integrated and works smoothly on this distribution.
            • Other Versions: The tool may work on other Linux distributions and also on Windows, but you may encounter some compatibility issues.


            Hardware Requirements:

            • Processor: Intel Core i3 processor or newer.
            • RAM: 4 GB or more.
            • Hard Disk Space: 10 GB or more.


            Additional Notes:

            • System requirements may vary slightly depending on the tool version and the Linux distribution used.
            • Make sure to update your operating system and drivers before installing the tool.
            • It is also important to have a working internet connection to fully utilize the tool.


            Important Resources:

            • Official GitHub page for Sherlock tool: https://github.com/sherlock-project/sherlock


            Installing: Sherlock Tool on Kali Linux

            Disclaimer:

            Before proceeding with the installation, it’s crucial to acknowledge that using Sherlock for illegal purposes might lead to legal repercussions. Employ the tool responsibly and ethically within the boundaries of the law.


            Step 1: System Update

            1. Boot Kali Linux: Begin by booting up your Kali Linux system.

            2. Open Terminal: Once the system is fully loaded, launch the terminal application. This will provide you with a command-line interface to interact with the system.

            3. Execute Update Command: Enter the following command to update the Kali Linux package repository:

            “sudo apt update“


            Step 2: Install Sherlock Tool from GitHub

            Installing Sherlock Tool

            1. Execute Installation Command: Once the system update is finished, proceed with the installation of the Sherlock tool using the following command:

            “apt install sherlock“


            Sherlock tool


            Step 3: Wait for Installation Completion

            Installation Progress

            1. Monitor Installation: Once you have executed the apt install sherlock command, the installation process will begin. You can monitor the progress by observing the output in the terminal window.

            2. Package Download: The system will first download the necessary packages for Sherlock and its dependencies from the Kali Linux repositories. The download speed may vary depending on your internet connection.

            3. Package Installation: After the packages are downloaded, the system will proceed with the installation of the Sherlock tool and its dependencies. This may involve extracting files, compiling code, and setting up configuration files.

            4. Completion Message: Once the installation is complete, you will see a confirmation message in the terminal window indicating that the Sherlock tool has been successfully installed on your Kali Linux system.

            Estimated Time:

            The installation process typically takes a few minutes to complete, but the exact time may vary depending on your system’s resources and internet connection speed. It’s advisable to have some patience and wait for the installation to finish without interrupting the process.


            Proceed to the next step once you see the confirmation message in the terminal window.


            Step 4 : Sherlock Tool Ready for Further Searches

            Now, as shown in the image above, the tool has been installed and is ready to search for people. All we have to do is write the name of the person whose accounts we want to search for using the following command.


            1- We write the command the name of the call for the call, and then the name of the person through the following command:

            “sherlock BillGates”


            Sherlock tool


            The administration was given an order to search for “BillGates” accounts, as noted in the command above. Now we wait for the tool’s search to finish.


            Sherlock tool


            As is clear, 154 accounts were found on various websites with the same name that was typed in the Sherlock tool.


            Important Note Regarding Username Search

            As you’ve correctly pointed out, it’s crucial to connect the characters when searching for usernames using the Sherlock tool. This ensures that the tool accurately identifies the complete username and doesn’t treat it as separate words.


            Handling Multi-Word Usernames

            If you’re searching for a username that consists of multiple words, such as “Bill Gates,” you should enter it as a single string without any spaces. For instance, the correct command would be:


            sherlock BillGates
            

            Incorrect Usage:

            If you introduce spaces between the words, the tool will interpret them as separate search terms. Consequently, it will only search for the first word (“Bill”) and disregard the second word (“Gates”).


            sherlock Bill Gates


            Acceptable Alternatives:

            In cases where you have a valid reason to maintain a space in the username, you can utilize alternative separators to differentiate between words while still conveying the entire username to the tool. Acceptable separators include:

            • Hyphen (–)
            • Period (.)
            • Hash (#)

            For example, you could search for “Bill-Gates,” “Bill.Gates,” or “Bill#Gates.”

            sherlock Bill-Gates
            sherlock Bill.Gates
            sherlock Bill#Gates


            Remember:

            • Accuracy: Using the correct format ensures accurate search results and avoids missing relevant social media profiles.
            • Flexibility: The tool accepts various separators, allowing you to maintain the original username structure when necessary.

            Effective Research Tool: Sherlock can be a valuable tool for researchers, journalists, and individuals seeking to gather information about others online.


            Respectful Usage: Always exercise caution and respect for privacy when utilizing Sherlock or any other online investigative tool.


            I hope this comprehensive explanation has provided you with a clear understanding of Sherlock’s capabilities and how to effectively utilize it for your online searches.


            I hope that I have succeeded in explaining the Sherlock tool in the most complete and easiest way. If you have a question or problem, do not hesitate to tell us below.

              July 5, 2024 0 تعليق
              0 FacebookTwitterPinterestWhatsappTelegramEmail
              Windows explanations

              Fern Wifi Cracker tool for WiFi network penetration

              by طارق June 20, 2024
              الكاتب طارق

              Tutorials | Fern Wifi Cracker Tool for Hacking Wi-Fi Networks

              In today’s world, Wi-Fi networks are essential for accessing the internet. However, these networks can sometimes be vulnerable to hacking by attackers using advanced tools like Fern Wifi Cracker.


              We have previously explained the method of hacking Wi-Fi networks using the Airodump-ng tool. However, this tool relies on the command line, so you need to know the codes.


              Unlike the Airodump-ng tool, Fern Wifi Cracker has a graphical user interface, making it relatively easier to use compared to the previous tool. This feature makes it very suitable for beginners in this field.


              In this article, we will explain what Fern Wifi Cracker is and how it works, and provide tips on how to protect your Wi-Fi network from being hacked.


              What is the : Fern Wifi Cracker tool?

              Fern Wifi Cracker is a wireless security auditing and attack software written using the Python programming language and the open-source Python Qt GUI library.


              The tool is capable of cracking and recovering WEP/WPA/WPS keys and also launching other network-based attacks on wireless or Ethernet-based networks.


              Fern Wifi Cracker was developed by Savio Code, a well-known programmer and content creator in the Kali Linux community. No official team has been announced as contributing to the tool’s development, but Savio Code receives contributions from the Kali Linux community through the GitHub platform.


              Fern-Wifi-Cracker is designed to be used for testing and discovering vulnerabilities in a person’s private network with the aim of fixing the discovered vulnerabilities.


              Features of: Fern Wifi Cracker

              – Ease of Use: It features a graphical user interface (GUI) that makes network penetration very easy, even for beginners.


              – Integrated in Kali Linux: It comes integrated in the popular Kali Linux distribution, making it easily accessible and usable.


              – Supports Multiple Attacks: It supports a variety of Wi-Fi penetration attacks, including WEP, WPS, and WPA/WPA2.


              Requirements for: Fern Wifi Cracker

              Operating System Requirements

              • Linux: Fern Wifi Cracker requires a Linux operating system to run.
              • Kali Linux: It is highly recommended to use Kali Linux, a Linux distribution specifically designed for penetration testing and security, because the tool is integrated into this distribution and runs smoothly on it.
              • Other Distributions: The tool may work on other Linux distributions, but compatibility issues may arise.

              Resource Requirements

              • Processor: Intel Core i3 or newer.
              • RAM (Random Access Memory): At least 4 GB.
              • Hard Disk Space: At least 10 GB.
              • Wireless Network Adapter: A wireless network adapter compatible with 802.11 b/g/n/ac standards.


              Notes:

              • System requirements may vary slightly depending on the version of the tool and the Linux distribution used.
              • Make sure to update your operating system and drivers before installing Fern Wifi Cracker.
              • It is also important to have a properly functioning internet connection to use the tool fully.


              Algunos sitios importantes

              • Official GitHub page for Fern Wifi Cracker: https://github.com/savio-code/fern-wifi-cracker

              • Kali Linux Documentation: https://www.kali.org/docs/

              • Kali Linux Forums: https://forums.kali.org/


              Network Targeting Method: Steps of Penetration

              Breaking into or bypassing the protection of a WiFi network is done through four stages, as follows:

              1. Searching for the targeted network.

              2. Selecting the targeted network.

              3. Obtaining the handshake file for the targeted network.

              4- Guess or crack the password of the target network.


              Yes, these are the only four steps through which you can penetrate any network on the face of the earth, but the method is not that easy.


              It’s true that the first two steps of searching and selecting the network are easy, but the difficulty lies in the third and fourth steps where you have to guess or predict the password.


              Explanation of the third stage: Handshake File

              It is a file used in network communications to exchange information between two devices when establishing a connection. This file typically contains identifying information about each device.


              Such as the initial address (IP address), device identifier (MAC address), and supported connection settings. The handshake file helps establish a smooth and secure connection between devices on the network.


              For example, when you connect your device to a new Wi-Fi network, a handshake file is sent to the Access Point that manages the network.


              This file contains information such as your device’s IP address and its MAC address, allowing the network to verify its identity and grant access to it.


              How to obtain this file?

              This file can only be obtained through one method, which is to wait in monitoring mode until a device with the password logs into the network.


              Okay, it seems waiting for someone to connect to the network is not practical and involves waiting for hours until someone logs in and obtaining this file.


              Okay, what if I told you that there’s a way to kick everyone off the network, so they’ll try to reconnect again, allowing us to quickly obtain the file.


              The Fern Wifi Cracker tool allows you to easily obtain this file by targeting the network and kicking everyone off it. Then, you wait for devices to reconnect, making it easy to obtain the handshake file.


              Explanation of the fourth stage: Password Guessing

              Guessing literally means trying to predict the password, such as manually testing passwords you think might be the network password. However, the factor of time is the reason this step often fails.


              Therefore, we need tools that accelerate this guessing process. Fern Wifi Cracker can do that; after obtaining the handshake file, you can input millions of potential passwords into a file you create yourself.


              And as previously explained, we discussed how to create a file containing your own passwords for use in targeting attempts, or selecting pre-existing files available in the Kali Linux system.


              After creating your file containing passwords and then placing this file into the password guessing tool, you can subsequently attempt to break the protection of the targeted WiFi network.


              Network Targeting Method: Using the Fern Wifi Cracker Tool

              Firstly, it should be noted that using this tool for illegal purposes may subject you to legal consequences.


              Note that if you encounter an error when enabling the monitoring mode of the tool, you should refer to our previous article where we explained how to resolve this issue.


              1. Start by booting up Kali Linux. From the toolbar, search for “fern” and click on the tool to open it.


              2. You will see a screen prompting you to enter the password to confirm that you are the system owner. The default password is usually “kali” if you have not changed it.


              Fern Wifi Cracker


              3. Now, by selecting the first option which is the adapter name, choose the modified name “wlan0mon“. If your adapter name is different, you can refer to the article here to change the name.


              4. We switch the device to monitor mode using the second option. We wait until the word “Active” appears next to it in green color.


              Now the tool is ready to target networks

              Now, as shown in the image above, the tool is ready to search for networks. All we have to do is choose the target network to crack the password.


              5. Click on the fourth option, which is “wifi wpa,” to search for the targeted network.


              Fern Wifi Cracker


              6. You will see another menu displaying nearby networks ready to be targeted. Choose “your network” then select the file containing the passwords (explained in step four above).


              Fern Wifi Cracker


              7- After clicking on the targeting word “wifi attack”, all you have to do is wait to obtain the password used.


              Fern Wifi Cracker


              And as shown in the image above, the handshake file password has been obtained, which is “12345678“. Now you can use this code to connect to the targeted network.


              End of explanation

              This is how you can obtain the password for any network you wish. The method relies on the password file you create, containing passwords you anticipate the target might use.


              Targeting will succeed, and through it, you can understand the attacker’s mindset. This allows you to set stronger and more unexpected passwords for your own network.


              I hope I have successfully explained the Fern Wifi Cracker tool clearly and thoroughly. If you have any questions or issues, please feel free to let me know below.


                June 20, 2024 0 تعليق
                0 FacebookTwitterPinterestWhatsappTelegramEmail
                Mobile phonesSolution

                Changing the Default Browser on Android

                by طارق May 24, 2024
                الكاتب طارق

                Solution | Changing the Default Browser on Android

                Many Android users seek to Changing the Default Browser on their devices, either to explore new options or enhance their browsing experience.


                This guide will delve into the steps involved in changing the default browser on Android devices.


                Benefits of Changing the Default Browser

                Switching to a different browser can significantly improve your browsing experience for several reasons:

                • Performance Enhancement: You might encounter speed or responsiveness issues with your current browser. Changing to a more efficient or optimized browser can address these performance bottlenecks.

                • Feature-Rich Alternatives: Different browsers offer unique features that cater to specific needs. For instance, some browsers excel in ad blocking, while others prioritize privacy-focused browsing modes.


                • Personal Preference: Ultimately, the choice of browser boils down to personal preference. You might favor a particular interface or find better compatibility with certain websites.

                Steps : Change the Default Browser on Android:


                1- Install a New Web Browser (if needed):

                If you haven’t already, download and install a new web browser of your choice from the Google Play Store. Popular options include Chrome, Firefox, Brave, and Samsung Internet.

                Changing the Default Browser


                2- Changing the Default Browser on Samsung Devices

                Access Settings: Open the “Settings” app on your Samsung device. Locate Default Apps: Navigate to “Apps” and then tap on “Choose Default apps“.

                Changing the Default Browser


                Select Browser App: Within “Default apps“, choose “Browser app“. Choose New Browser: A list of installed browsers will appear. Select the browser you want to set as the default.

                Changing the Default Browser


                3- Changing the Default Browser on Other Android Devices:

                Access Settings: Open the “Settings” app on your Android device.


                Locate Default Apps: The exact path might vary slightly depending on your device’s manufacturer. Look for options like “Apps & notifications” or “Apps” and then navigate to “Choose Default “.


                Select Browser App: Within “Default apps“, choose “Browser app“.


                Choose New Browser: A list of installed browsers will appear. Select the browser you want to set as the default.

                Changing the Default Browser

                Additional Tips:

                a. Explore Different Browsers: Try out various browsers to determine which one suits your preferences and usage patterns. Each browser offers unique features and performance characteristics.


                b. Keep Your Browser Updated: Ensure your chosen browser is always running the latest version. Updates often include security enhancements, performance improvements, and bug fixes.


                c. Utilize Browser-Specific Features: Take advantage of the unique features offered by your chosen browser. For example, explore ad blocking capabilities, privacy-focused browsing modes, or personalized extensions.


                By following these steps and considering the additional tips, you can effectively change the default browser on your Android device and optimize your browsing experience.

                  May 24, 2024 0 تعليق
                  0 FacebookTwitterPinterestWhatsappTelegramEmail
                  Mobile phonesSolution

                  Live Streaming on Twitch Using the Mobile App

                  by طارق May 23, 2024
                  الكاتب طارق

                  Solution | Live Streaming on Twitch Using the Mobile App

                  Twitch: Your go-to for Live Streaming on Twitch. Engage with gamers, creators, and communities worldwide. Stream anywhere with the app


                  About Twitch App:

                  app Twitch is a leading platform for live streaming, allowing users to broadcast and watch live video clips of video games, esports events, and other live shows.


                  Twitch stands out for providing instant interaction between streamers and their audience through live chat, creating an interactive and enjoyable experience. can be accessed via smartphones, tablets, and computers.


                  Whether you want to stream games or showcase moments from your daily life, you can easily do so using the Twitch app. In this article, we will outline simple steps to set up and live stream using an Android or iOS device, allowing you to reach your audience wherever you are.


                  Step 1: Download the Twitch App


                  Live Streaming on Twitch Using the Mobile App


                  App Size:140 MB
                  App Compatibility:Supports iOS and Android devices
                  License:Free


                  Application download link

                  Live streaming

                  Live streaming


                  Step 2: Create an Account / Log In

                  After installing the app, open it and follow these steps:

                  1. Log In: Enter your Twitch account information to log in. If you don’t have an account, you can easily create one through the app.
                  2. Two-Factor Authentication: You may need to set up two-factor authentication to ensure the security of your account.

                  Live Streaming on Twitch Using the Mobile App


                  Step 3: Live Streaming on Twitch

                  Here’s how to live stream on Twitch from an Android device:


                  1- Open the Twitch app and tap on “Create” in the top right corner to switch to Creator Mode. If you see “Watch” instead of “Create” proceed to the next step.


                  2- Tap the “Create” button in the bottom center and select “Stream IRL.”


                  Live Streaming on Twitch Using the Mobile App


                  3- Grant Twitch permission to access your camera and microphone. Once done, Twitch will display a camera preview for the stream.


                  4- Tap the “Edit” button (pencil icon) to customize your stream’s information. Important fields to customize include Title, Category, Go Live Notification, and Tags. Tap “Save” in the top right corner to save your changes.


                  5- To start the live stream, tap the “Stream” button (circular button with a purple ring) at the bottom left.


                  Live Streaming on Twitch Using the Mobile App


                  Now, while your stream is live, you’ll see the duration, current viewers, and total followers at the top.


                  Once you finish streaming, tap the same “Stream” button at the bottom left and confirm by selecting “End Stream” from the pop-up.


                  Reminder: Whether you’re streaming from your smartphone or PC, remember to avoid actions that could lead to your ban from Twitch.


                  Drawbacks: Streaming from Mobile on Twitch

                  Live streaming on Twitch via mobile has its advantages but also comes with limitations you should be aware of:


                  • When streaming from your phone, everything you see is visible to your viewers due to limited screen space. This may not be convenient if you receive many messages from followers.


                  • The stream will automatically end if your phone screen is locked. Avoid using headphones or Bluetooth devices as they may not provide the best audio experience. Twitch advises against using headphones if you need to capture all sounds.


                  • Unlike PC, you can’t simultaneously capture your screen and camera. You’ll have to choose one.


                  • While streaming on Twitch via mobile is simple, it comes with limitations. Consider these limitations and decide if you can tolerate them. Otherwise, using a laptop or desktop for live streaming on Twitch might be a better option.


                    May 23, 2024 0 تعليق
                    0 FacebookTwitterPinterestWhatsappTelegramEmail
                    WindowsWindows explanations

                    Fern wifi cracker problem in Kali Linux

                    by طارق May 5, 2024
                    الكاتب طارق

                    Explanations | Fern wifi cracker problem in Kali Linux

                    In the Kali Linux system, there are many pre-installed tools ready for use, including the excellent Fern WiFi Cracker tool.


                    The tool handles all the commands required by the user to execute the process of cracking or guessing the password for a specific Wi-Fi network. and it is considered one of the best tools in this field.


                    If you’re a new user of the tool. you may encounter an issue when using it for the first time. which is the appearance of an error message stating “Problem occurred while setting up the monitor mode of selected [interface].


                    wifi cracker problem


                    “This message usually appears when the Fern WiFi Cracker program attempts to activate Monitor Mode on the specified network interface but encounters an issue in doing so. To resolve this problem, follow the instructions below.”


                    road : Fern wifi cracker problem in Kali Linux

                    “The problem only continues with your network name, and the solution is simple. Just change the name to match Fern WiFi Cracker tool, as follows:


                    1-First, we start by running the command prompt as an administrator, then we write the following command:”


                    “airmon-ng”


                    wifi cracker problem


                    2- Now, we write the name of the current network. which is default when installing Kali system, in the following command:


                    “ip link set wlan0 down”


                    Fern wifi cracker


                    3- Now, we write the name of the network needed by Fern WiFi Cracker tool in the following command:


                    “ip link set wlan0 name wlan0mon”


                    Fern wifi cracker


                    4- The name has now been changed to ‘wlan0mon’. To confirm that the change has been made, we write the following command again:


                    “airmon-ng”


                    Fern wifi cracker


                    This way, your network name has been changed. and all we need to do is go to the Fern WiFi Cracker tool to confirm that the network name has been changed, allowing us to use the tool.


                    As evident in the image above, monitor mode has been activated in the tool, allowing us to proceed with the remaining steps to crack or guess the password for a specific network.


                      May 5, 2024 0 تعليق
                      0 FacebookTwitterPinterestWhatsappTelegramEmail
                      Newer Posts
                      Older Posts

                      البحث

                      موضيع شائعة

                      • 1

                        How to install ALFA AWUS036ACS driver in Kali Linux

                        April 29, 2024
                      • 2

                        Folder Widget: An App Organization Tool for Android

                        July 9, 2024
                      • 3

                        Fern wifi cracker problem in Kali Linux

                        May 5, 2024
                      • 4

                        Fern Wifi Cracker tool for WiFi network penetration

                        June 20, 2024
                      • 5

                        How to update Kali Linux in the easiest way

                        March 4, 2024

                      LATEST TECH NEWS

                      Subscribe my Newsletter for new blog posts, tips & new photos. Let's stay updated!

                      • Facebook
                      • Twitter
                      • Instagram
                      • Telegram
                      Footer Logo

                      جميع الحقوق محفوظة @ OS73.com


                      الرجوع لأعلى
                      os73
                      • Windowsويندوز
                      • posts
                      • Mobile phonesالأجهزة
                      • Privacy Policy
                      • About
                      • English
                      • العربية
                      os73
                      • Windowsويندوز
                      • posts
                      • Mobile phonesالأجهزة
                      • Privacy Policy
                      • About
                      • English
                      • العربية
                      os73.com @2024 - جميع الحقوق محفوظة